So, without further ado... please welcome Erica! :)
* * *
Hey all! I am really excited to be taking a quick break from Mrs. V's Grade Threes to come on over for a guest post about my sliding bulletin board project from this summer.
This is my second year in my current classroom and last year I had such a hard time managing all my storage space. I know I know - What teacher complains about storage space? The problem I have is my tendency to simply pile stuff wherever it fits which left me with a bunch of shelves that were a pretty far cry from being organized.
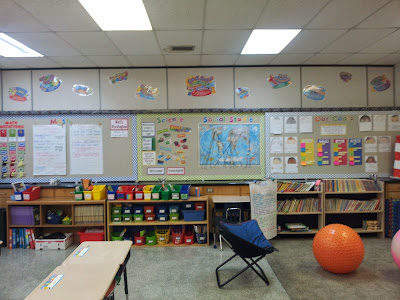
I may not be the world's greatest organizer but I do like to have my work space as neat and tidy as possible. So I came up with a plan to cover the shelves in bulletin boards but of course I didn't want to lose the storage. The solution was fairly simple since I had seen sliding bulletin boards in a few newer schools and thought it was a great idea. Of course I don't have a budget to match that of a newly built school so I had to think a little outside the box.
After a little creative thinking and some physical labour I figured out a way to do it and I am super happy with the results!
See more pictures below.
The first step was figuring out what materials I would be able to use (and afford) and how I would put everything together. Here is a quick list of the basic materials I used:
- 2" x 6" boards
- dual sliding door tracks (purchased at a hardware store)
- 4' x 8' donacona boards (typically used for insulation they are not super durable but they are nice and lightweight which made them easy to hang and maneuver)
- metal J-trim (hardware store)
Putting them together took a little bit of trial and error but now that I have them up I am in love with them. There are still a few glitches - one of the boards could be trimmed since it rubs against the counter which makes it hard to move - but overall they are serving their purpose beautifully.
Having the counter was really important since it gave me a place to put the guide-tracks which keeps everything in its place and prevents the boards from being able to swing away from the cabinets. I am not sure if it would work as well in other situations but hey you never know until you try.
So now for a basic run-through of how I put it all together:
#1 - I used the 2" x 6" boards to create an overhanging ledge where I could attach the sliding door. I attached one of the tracks (I had to use 3 8-foot tracks for my boards) to the board so I could make sure the edges were flush and the track would fit fairly tight to the cabinetry.
#2 - Once all the boards were in place I installed the closet door tracks by following the instructions in the box.
#3 - My donacona boards were slightly too tall (I needed to shave off about an inch) so I whipped out a saw and trimmed em down. It's a really soft material and the saw cut through it like butter.
#4 - The hardest part of all of it was attaching the sliding door hardware (the little wheely bits that slide in the tracks) to the boards. As I mentioned before the boards are made of a pretty soft material so I had to find a way to anchor the screws in. This is where the metal J-trim comes in. I cut the J-trim into 3-inch pieces using metal cutters so I could use it as an anchor for the hardware. Wherever I attached a slider I first put a piece of the J-trim so that when I put a nut and bolt through the hardware to attach it to the board it was going through a piece of metal. The screws would break out of the donacona board pretty easily. The picture isn't super clear but hopefully it helps.
#5 - Carefully put the boards into the sliding tracks. In my case I couldn't angle the boards in from top to bottom since the sink faucets were in the way. We had to leave one of the sliding tracks off, put the boards on and then attach the final piece of track.
Once the boards were up and in place I painted them (it takes a few coats) and added some decor to make it pretty as well as functional. Here is what they look like today:
I believe teachers know best what they need from their classroom space and unfortunately not every classroom is built to order. I loved all the storage in my room but didn't have any space to display anchor charts or student work. Lucky for me I have an administrator who gives me the chance to try some DIY projects and when they work out like this it is even better! I love having the extra wall space in my room to display student work, curricular content, and anchor charts among other things. Yes the boards are far from perfect but they have made my classroom more functional, more organized, and generally improve the overall feel of the room.
* * *
Wasn't this an AMAZING project to DIY in her classroom?
Make sure you check out Erica's 3rd grade blog! She's new to blogging but already sharing some amazing ideas and great classroom photos. (If you're anything like me, you love seeing photos of other teachers' classrooms!)
Thanks for sharing such a great project, Erica! :)


I love it! Great idea.
ReplyDeleteStephanie from Principal Principles