photo Image277_1x1_zps92a4c832.gif photo Image277_1x2_zps82501ae2.gif photo Image277_1x3_zpse2f7619b.gif photo Image277_1x4_zpsbfd3d820.gif photo Image277_1x5_zps55244bd5.gif photo Image277_1x6_zpsa94012cf.gif

Thursday, February 28, 2013

Test Prep Freebie! - Reversing the Question

Well, most of you out there seem to be gearing up for Read Across America with Seussy activities all week. We did make "Oobleck" yesterday with our younger grade buddies, but otherwise, we're spending a lot of this week doing the oh-so-fun test prep!

I don't enjoy test prep, and I don't think it's the best thing for my students, so really, we haven't done much up until now. We've stuck to quality educational activities that hopefully will transfer to the test. But considering how high-stakes our tests are (without an exemption, students can be held back for not passing a 3rd grade reading test), some of my students are worried and I want them to feel prepared.

"Test Prep" In My Classroom:
  • Do massive amounts of review. (Honestly, that's a good thing no matter the purpose.) There's nothing like a 3rd grader going, "What's a noun again?" in February to make you freak out a little.
  • Show students the test format, and give students practice using a similar test format so they feel comfortable with it. Most of my kids are like, "Oh. That's it?"
  • Let students see some feedback on their practice, especially those who speed through it, fail to follow directions, or don't work very carefully.
  • Teach them about tests as a "genre" that we read differently, just as we read other genres differently than each other.
  • Talk briefly about strategies for ones they don't know, and tell them that "pass" doesn't mean "perfect."
  • Show them the writing rubric. (It's important for them to know how they will be scored!) I'm letting them score their own writing to see how they would do. (They are so hard on themselves!)
  • I also share with them a few things from the state website, and a few tips for destressing (for instance: smiling and positive thinking are both proven to help you relax and do better).

It's not my favorite thing to teach- but I tell my students this is a chance to "show what they know" and I want them to know what to expect and to feel confident when testing time comes. And since we will be spending next week testing, the week after that is Spring Break, and the week after that testing, I think it's worth spending a bit of time letting them know what to expect and building their confidence.

This is my first year in a state testing grade, and I have to say, I'm a little terrified myself. My school has a very strong test record in part due to the homes most of our students come from, so chances are very good that they will do just fine. Still, it's nerve-wracking and I will be way happy when our testing is done.

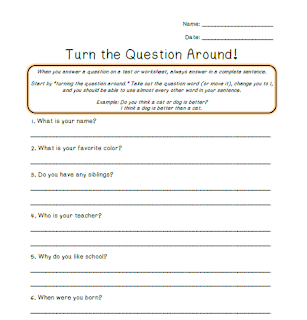
Since our Indiana test starts with "Applied Skills," the open-ended and writing portions, we're practicing how to "turn the question around," or reverse the question, in order to help us write our answer in a complete sentence. I think it helps kids be able to for sure answer what the question is really asking, too.

I teach them to cross out the question word (who, what, when, etc.), move the verb, and switch personal pronouns from you/ your/ etc. to I/me/my. I also talk to them about the partners of why/because and how/by.

We did a game of Inside-Outside Circle to practice orally, and did two worksheets (different days) to practice and assess.


Is this something you teach?


If it is, be sure to check out this product here. Feedback and comments would make my (test-stressed) heart happy!

(Note: this product was formerly free for followers, but is now a paid product. Be sure to follow my blog so you don't miss out on future freebies!)

Wednesday, February 20, 2013

Stone Soup Celebration (and bacon?!)

I am sliding in juuuust under the wire to join in Jennifer’s Something Good linky!

Something Good at Home: Can you say 3-day weekend? I got to hang out with my mom, 2 family friends, my mother-in-law, her boyfriend, my cousins, a couple of coworkers, and 3 good friends- plus, of course, my husband. We spent some time watching improv comedy, playing with a puppy, watching The Muppets (a Valentine’s gift!), and visiting the Indianapolis Children’s Museum (which is just plain amazing).
Something Good at School: My students hosted a Stone Soup celebration last Friday to honor some people who we appreciate in our school. It was a great opportunity to write letters detailing the things we love about some of the people who make our school work.
IMG_9312
My students each brought in one ingredient (okay, well, most of them did). We thankfully didn’t have too much overlap, and most parents washed and cut things first.
IMG_9395
Of course, we added stones first. (Oh, and a crock pot liner. Seriously, these things are SO worth it.)
IMG_9396
We added to the crock pots and let the soups cook for a few hours.
IMG_9400
They turned out delicious, and when each person stopped in for soup, we paused to raise hands and share specific compliments or things we liked about that person. A couple of teachers nearly teared up. The kids also got to eat lunch in the room and try a little cup of soup. It was such a sweet way to end last week!
*Random side note: my husband does improv comedy, and recently acted in a (kind of ridiculous) local Internet commercial. He was paid in money and bacon, so I keep joking about him (literally) bringing home the bacon. If you have a minute, check it out.


By the way, the bacon was deee-lish. Hope you are having a great week!

Tuesday, February 19, 2013

Think Outside the Box! – Hands-On Geometry

We have been having a blast learning about geometry in my class! We started by learning about patterns, and we made Winter Carnival decorations at the same time…

IMG_9430

These were inspired by Camille from An Open Door, and she offered a great link to download printable pattern block shapes, too!

IMG_9428

It was a great “blizzard” for the hallway (and incredibly simple for me to prepare!)

Our math vocabulary board is overflowing! 3rd grade geometry adds a LOT more concepts. We go from faces, edges, vertices, and basic identification to suddenly learning about lines, angles, and classifying into polygons and types of triangles. (Not to mention the next chapter, which adds congruency, symmetry, and more.)

Because my kids don’t really have shape/ solid names and faces/ edges/ vertices quite down yet, we spent Valentine’s morning making toothpick and marshmallow shapes, angles, and solids.

IMG_9340

I really got to challenge their understanding- after some “easy” ones, I gave them ones they hadn’t memorized, like trapezoidal prism, to see if they really understood what a “prism” was. For the tough ones, they worked with their neighbors to figure out what the solid was AND how to make it.

IMG_9323

To learn the new vocabulary, we’re doing TONS of partner talk, writing to explain, and hands-on learning. We’re also doing small amounts of Whole Brain Teaching-inspired definitions with motions, and trying to make it concrete as much as possible.

One very fidgety day, I split students into groups of 4 or 5 and had them use their bodies as teams to make shapes.

IMG_9414

Some students laid down and used their whole bodies, others sat down and used their legs, and some stood and used their arms. Nearly every group found a different way to make the shapes, but having a group of 4 make, say, a pentagon really required some creativity. They also did a lot of explaining to one another and needing to work as a team, and of course it made a great excuse to get up and move around!

Most of my ideas aren’t new, but my students have been loving this unit! How do you “think outside the box” to help your students learn geometry in a more concrete way?

P.S.—Thanks to everyone who picked up my free fonts and especially those of you who left feedback and followed my new TpT store! :) You made my day.

Monday, February 18, 2013

14 New (and Free) Fonts!

It's a freebie Monday!

Classroom Freebies Manic Monday


I am loving my day off! (For us, it would've been a school day except we haven't had any snow days yet.) I probably should be productive... but I'm enjoying a little break. Hopefully, if you have the day off, you are, too!

For today's freebie... 14 new fonts to download!

 
For some reason, I can't really get this to look clear- but I promise, the fonts aren't blurry! (Any tips?)

Terms of use are simple- you can use these for personal or commercial use, but you need to please credit me- Luckey Fonts at Luckeyfrog's Lilypad. Of course, I would *love* if you'd leave me some feedback or followed me on TpT as well. (My store is brand new! :)

Let me know what you think, and happy Monday!

Saturday, February 16, 2013

Organizing my Teacher Desk

So I’ve written a little about this before in my new teacher series, “I Just Got a Teaching Job- Now What?!” but my desk is an area that can always use some improvement. As I’ve said before, I HAVE to keep my teacher desk- and mine’s huge.

So, this summer, here’s what my right desk drawer looked like:

I forgot to get a complete before picture, but be assured it didn’t look like that anymore.

IMG_9446

Here it was after I cleared out the back. Clearly, the front is craaazy. The culprit? Too much tape. I decided to repurpose this art box and fit most of the tape inside.

IMG_9449

I may be a magnetic tape hoarder.

IMG_9452

Special computer paper (thank you, Dollar Tree!) is now underneath my index cards. The ones in boxes are needed for when I post vocabulary words. And tape is better contained.

IMG_9454

This is how the front looks for now, but I think it’s too crowded… I am loving using the old index card boxes as dividers, though, and I think some of the other things just need a little divider in the back to be their new home!

IMG_9456

Later I moved the hand sanitizer because there’s a better spot in the other drawer.

Needs a little work, but it’s better!

The left desk drawer was even crazier, but here’s how it ended up.

IMG_9458

I love using these little baskets as dividers to hold my stamps and Post-Its, but I think most of the stamps are headed for the teacher’s lounge soon. I just don’t use them enough. I think putting my stickers in it might make more sense, if I just cut them down to fit.

Under the black thing on the left, there’s a little teacher emergency bag. I took pictures so I can post about the contents soon.

IMG_9457

The right side definitely looks kind of crazy, but it actually holds 3 separate packets.

winter 2013

On the left, supplies and certificates for when my kids reach Sparkling. The top right, reading rewards. The bottom right, birthday certificates and stickers, all ready to go and filled out in order. It might not look super neat, but it makes it really easy to grab-and-go!

I still need to take care of the middle drawer (which totally still looks like it did this summer… riiiight…)

IMG_7861[1]

and one of the file drawers, and the top- but honestly, the filing involved is going to take me hours. This week, I just did not have the time. I am doing better at keeping the top of my desk cleaner, though!

IMG_9463

I might go in on Monday and work on it… or I might enjoy a day at home, lounging and grading. We’ll see :) So glad we have a make-up snow day!

What I’m loving about the CFC Challenge is that it gives me something to think about each week. Yeah, my desk isn’t all the way organized yet- but I had a very busy week, and I can bet that without this challenge I wouldn’t have even touched all that mess. Progress still counts, and posting about it helps keep me accountable.

I can’t wait to see some of your successes!

Saturday, February 9, 2013

Reading Caravan

So, I have a tendency to overload myself sometimes. When it comes to volunteering for things around the school, I like to be involved.

At this point, I’m on the RTI Committee, Social Committee, a school counseling Steering Committee, plus tutoring 2 kids (going up to 3 this week).

And then the principal asked if anyone would like to be on the Reading Adoption Committee.

I knew it was probably one more thing I didn’t really need to do, but dang it- I’m a curriculum nerd and I reeeally wanted to do it.

Last week I got to go to a “reading caravan” where 7 companies presented their reading series to a whole ballroom of teachers.

Holy Tote Bags.

We heard from and previewed materials from:

  • Wonders
  • Journeys
  • Reading Street
  • National Geographic (Reach for Reading)
  • SuperKids
  • Benchmark Literacy
  • one more?

And I’m wondering what you think of these materials or others that you have. We are really looking at lining up our curriculum with the Common Core (although, as Mary Beth pointed out, there are some Indiana legislators who now want to go back from the Common Core, so hopefully that will get sorted out soon).

We want to go deeper, not wider, with the curriculum. We are lucky to have a lot of kids reading above grade level, but we also have a lot of ESL students from a large, large variety of countries. Rather than wanting everything AND the kitchen sink (which most of these come with), we want really quality basic elements and well-chosen literature and non-fiction. We want our students prepared for tests- but please for the love of all that is wonderful about reading, not through worksheets but through REAL reading. We want some flexibility because we are (thankfully) given a lot of freedom to teach in different styles, including workshop and CAFÉ/ Daily 5.

We are even considering purchasing novel sets and trade books at the 3rd grade level, although I think it might require more cohesion than the current grade level team really has.

Do you have one of these series? What do you think? Are there other series we should look into?

THANK YOU! :) I know input from real teachers would help us so much more than sale pitches.

Thursday, February 7, 2013

Author Visit

We were lucky enough to have an author and illustrator team, Tad and France Mitchell, visit our school last week.

I think author visits are fantastic for kids as writers. Getting to meet a “real” author is so inspiring and can make reading and writing come alive.

The author and illustrator team that visited us this winter have one book, Where is the Sears Tower?, which they self-published.

IMG_9409

They were kind enough to offer a free paperback copy of the book to each classroom teacher that agreed to read the beginning of the book to the kids.

But what I really loved about their book was the brilliant artwork that many of my kids could recognize. We’re within a few short hours of Chicago, and the book features famous landmarks like Soldier Field, the “Bean,” and Navy Pier, along with- of course- the Sears Tower (now called the Willis Tower). Many of my students had been to places in the book and loved seeing familiar places.

IMG_9404

Some of the canvas art was actually brought to our school, where the kids could see the paintings up close. The artwork was just incredible.

When they visited, the couple “acted out” the beginning of the book and talked about the message of “following your inner compass.” They talked about where they got their ideas and talked at length about the process of writing, illustrating, and actually publishing a book.

They even brought a video showing how the paperback and hardback books were printed and put together.

IMG_9419IMG_9423

Every student got to take home a bookmark featuring the artwork, and those who wanted could buy copies of the book or art prints of the illustrations. The books were even personalized for free.

We’re planning on having another author visit later in the year (thanks to our amazing parent council and both authors living only a couple of hours away), but my kids really enjoyed meeting these two.

If you live near Chicago, you should definitely look into getting a copy of the book for your classroom! Your kids will really enjoy it.

Wednesday, February 6, 2013

Currentlyyy

Already a month into the new year… and I’m still writing 2012.

image_thumb[1]

Since making this a couple of days ago, we got Hulu Plus and totally caught up on Modern Family.

Funfetti and puppies are both hard to resist!

Seriously, people who use the wrong its/it’s, people who don’t use a turn signal, and people who are just plain RUDE drive me crazy. I have had a little too much of that last one this week!

On a happier note, my PTA is awesome about sending in our Box Tops, but actually divides the money earned by class. My class earned over $50, and my class and I picked out lots of new books with some of that money and my Scholastic points/ promos.

Today, the books arrived!

photo

Pretty great, huh? I bought the “25 Books for $25” collection and lots of others. My kids were SO thrilled. 54 books for about $50 was fantastic!

We took a break from our normal afternoon routine to open the boxes, read our new books, and separate them by genre. I’m getting nervous about our testing (coming up in about a month), but it felt amazing to take a day off and let my kids just plain be excited about reading!

Sunday, February 3, 2013

Multiplication Facts & Time Test Organization

As a kid, time tests were always something to groan about. No one really likes them, and as a teacher, I started my career totally against them.

Well, then I realized that teaching kids strategies isn’t always enough. With my current class, we worked and worked and worked on multiplication strategies. I didn’t want them to just use rote memorization.

We made arrays with freebies from Third Grade Gridiron.

We made multiplication flipbooks to show a strategy for each factor. (I apparently didn’t take a picture of these. Oops.)

The Best Of Times

We read this book (which I got through Scholastic and found to be AMAZING for teaching number-sense-based strategies for multiplication). We have probably read it 10 times, at least, as a class.

We did all of the Envision math lessons (and, for once, I really felt like our math series taught the strategies pretty well!).

image

We practiced games on the SmartBoard and in the computer lab at Arcademics.com – which the kids love and I found very simple to use. (Plus- free!)

We played all kinds of Bump and Roll-and-Cover games. (A few free ones here from my friend Denise!)

But some of my kids were only able to use the strategies when I reminded them, or their addition skills were so weak that they couldn’t do the multiplication quickly.

image

I have been using XtraMath to assess my students’ math fact knowledge this year, and I LOVE it. For a free program, I think it’s incredibly well-designed. Now that I’m in a district where almost every family has Internet access, it’s a great way to get parents involved and keep them up-to-date on their student’s progress. Even better- it’s easy for me to set up. After making a teacher account, all you have to do is type in student names, click one button to print all of the personalized parent letters, and set up a classroom code once on your classroom computers.

image

For each student, it shows me a grid and also a calendar of when they’ve been on and how they’re doing.

While I love this site and the way it moves students through the operations, I found that I really couldn’t assess all of my students’ multiplication facts because some were still on addition and subtraction.

So- sigh- enter the traditional time test. My students get to take one every day FOR SURE (which not all were doing with XtraMath) and there is a sense of urgency for the students that haven’t really kept up with XtraMath on the computers.

Unfortunately, it requires daily grading and tracking for me, and organization of the different levels of time tests. (Yuck.)

Here’s how I do it while staying sane:

First of all, I keep each time test organized in a cardboard paper sorter. I have two of these covered in contact paper that I got from a teacher who was upgrading her ‘mailboxes.’ I’ll stick the other on top of it as my students move through the levels and I need more space. I used Super Sticky Post-Its to label it, and I got the time tests from Super Teacher Worksheets – yes, they are now a subscription site, but SO worth the small cost per year.

IMG_9415

When it’s time to take a time test, I tell the students (usually in groups) to go get the paper they need. If they don’t know, I can look it up quickly and easily.

I have all of my originals and answer keys in a file folder. To the front, I paper-clip my records. I have student names along the left side, and then ten spaces for test scores.

IMG_9418

When I collect the time tests, I ask students to come up by level (A, B, C, etc.) Yes, the students know how the other students are doing. But we talk a lot about how improvement is the most important, and usually as the kids come up to me, they’re cheering that they got them all done, or I’m complimenting someone on getting closer this time, and it’s not been an issue in my class.

Collecting them by level makes it easy to grade by level. In the box, I record the test level (A, B, C, etc.) and the score out of 50. I color-code each level, which doesn’t actually take that much time.

I pick up the purple pen for the A’s, getting the key out of my folder. I record the A’s before going on. When I switch to B’s, I switch keys and pen color. I place all of the graded-and-passed ones in one pile, and all of the graded-but-didn’t-pass ones in another pile. This makes it easy to add stickers to the Passers before I hand them back.

At the end, I highlight the Passers (those who got 50/50) on my chart.

IMG_9413

Look how easy it is at a glance how someone is doing!

Once a week I check to see what levels might need more copies, and I snag the originals out of my folder to do them. Easy peasy!

It still takes time every day. There’s no way around it. But keeping the time tests organized has really helped keep it from eating into my day any more than it has to.

So, do you give you kids time tests to assess their math facts?

Saturday, February 2, 2013

Clutter-Be-Gone!

Here we go again- week 3!

The challenge this week was to go around the room and put away all that little stuff that has a place, but you just haven’t gotten to putting away yet.

I didn’t get as much done as I would’ve liked, but I think it’s pretty important for me to keep blogging about how things are going regardless.

This is the sink area in the back of my room, where I store snacks, food supplies, and supplies for students to access as needed.

Before:

IMG_0155

After:

IMG_9437

Many of these things could fit in the cabinets, when I just took the time to organize them better! It’s much easier to find what I need back there now. I still need to do something with the pocket chart back there (yellow blob), and figure out a better use for the trays to the left, but the junk is gone.

My desk area has definitely been slowly making progress, too. It’s slow- but it’s getting there.

Before:

IMG_0150

After:

IMG_9454

This area is still somewhat cluttered, but I went through my pens, pencils, and markers to throw out those not working (and put in my new Christmas pens). I also put lots of little things back where they belong, and started using the blue bucket above as a catch-all for Post-Its, tardy notes, and the other *little* things that find themselves onto my desk. Eventually, I think I want a better solution, but it’s better for now.

I think going through some of the clutter is helping me see which systems are not working. I don’t have a great way to store papers copied ahead (probably in part because I’m not usually working very far ahead!). I need a different place to put scrap paper that students can use for bookmarks (because it’s currently sharing a space and not working!). I need to have a place for extra copies, and another place for copies that I file (and I need a way to make sure I actually file them, too!)

I still have areas that I need to “purge,” but I’m seeing little bits of progress, and I’m excited to keep going!

It’s not too late to join, if you want :) Check out the other participants in this week’s challenge here.

Time to go enjoy breakfast!

IMG_0053

P.S.- I have Internet back at home again, and I love it!